The following sections provide step-by-step instructions for setting up and running cross datacenter replication (XDCR) between two or more VoltDB clusters. The sections describe how to:
Design your schema and identify the DR tables
Configure the database clusters, including:
Choosing unique cluster IDs
Identifying the DR connections
Start the databases
Load the schema and start replication
Later sections discuss other aspects of managing XDCR, including:
Updating the schema during replication
Stopping database replication
Resolving conflicts
Important
XDCR is a separately licensed feature. If your current VoltDB license does not include a key for XDCR you will not be able to complete the tasks described in this section. See your VoltDB sales representative for more information on licensing XDCR.
To manage XDCR, VoltDB stores a small amount (8 bytes) of extra metadata with every row of data that is shared. This
additional space is allocated automatically for any table declared as a DR TABLE on a cluster configured with the <dr> role attribute set to xdcr. Be sure to take this additional
space requirement into consideration when planning the memory usage of servers participating in an XDCR network.
Next, you must identify which tables you wish to share between the databases. Only the selected tables are copied. You identify the tables in the schema with the DR TABLE statement. For example, the following statements identify two tables to be replicated, the Customers and Orders tables:
CREATE TABLE customers (
  customerID INTEGER NOT NULL,
  firstname VARCHAR(128),
  LASTNAME varchar(128)
);
CREATE TABLE orders (
  orderID INTEGER NOT NULL,
  customerID INTEGER NOT NULL,
  placed TIMESTAMP
);
DR TABLE customers;
DR TABLE orders;
You can identify any regular table, whether partitioned or not, as a DR table, as long as the table is empty. That is, the table must have no data in it when you issue the DR TABLE statement. The important point to remember is that the schema definitions for all DR tables, including the DR TABLE statements, must be identical on all the participating clusters.
The next step is to configure and initialize the database root directories. The database clusters can have different physical configurations (that is, different numbers of nodes, different sites per host, or a different K factor). Identical cluster configurations guarantee the most efficient replication, because the databases do not need to repartition the incoming binary logs. Differing configurations, on the other hand, may incrementally increase the time needed to apply the binary logs.
When initializing the database root directories, you must also enable and configure DR in the configuration file, including:
Choosing a unique ID for each cluster
Specifying the DR connections
You enable DR in the configuration file using the <dr> element and
including a unique cluster ID for each database cluster.
To manage the DR process VoltDB needs to uniquely identify the clusters. You provide this unique identifier as a
number between 0 and 127 when you configure the clusters. For example, if we assign ID=1 to a cluster in New York and
ID=2 to another in Chicago, their respective configuration files must contain the following <dr> elements. You must also specify that the cluster is participating in XDCR by
specifying the role. For example:
New York Cluster
<dr id="1" role="xdcr" />
Chicago Cluster
<dr id="2" role="xdcr" />
For each database cluster, you must also specify the source of replication in the <connection> sub-element. You do this by pointing each cluster to at least one of the
other clusters, specifying one or more servers on the remote cluster(s) in the source attribute.
You only need to point each connection source at servers from one of the other clusters, even if more clusters are participating in the XDRC relationship. However, it is a good idea to include them all in the source string so the current cluster is not dependent on the order in which the clusters start.
For example, say there are two clusters. The New York cluster has nodes NYserverA, NYserverB, and NYserverC. While the Chicago cluster has CHIserverX, CHIserverY, and CHIserverZ. The configuration files for the two clusters might look like this:
New York Cluster
<dr id="1" role="xdcr" >
   <connection source="CHIserverX,CHIserverY" />
</dr>
Chicago Cluster
<dr id="2" role="xdcr" >
   <connection source="NYserverA,NYserverB,NYserverC" />
</dr>
Note that both clusters must have a connection defined for active replication to start. An alternative approach is to initialize the databases leaving the source attribute of the <connection> element empty. You can then update the configuration to add source servers once the database is up and running and the appropriate schema has been applied. For example:
<dr id="1" role="xdcr">
   <connection source="" />
</dr>
Once the configuration files have the necessary declarations, you can initialize the root directories on all cluster nodes using the appropriate configuration files:
New York Cluster
$ voltdb init -D ~/nydb --config=nyconfig.xml
Chicago Cluster
$ voltdb init -D ~/chidb --config=chiconfig.xml
If you then want to add a third cluster to the XDRC relationship (say San Francisco), you can define a configuration file that points at either or both of the other clusters:
San Francisco Cluster
<dr id="3" role="xdcr" >
   <connection source="CHIserverX,CHIserverY,NYserverA,NYserverB" />
</dr>
When configuring three or more XDCR clusters, you also have the option of specifying which cluster a new instance uses as the source for downloading the initial snapshot. For example, if two of the clusters are located in the same physical location, you can specify the cluster ID of a preferred source to reduce the time needed to synchronize the clusters. Note that the preferred source attribute only applies when the database first joins the XDCR environment or if DR is restarted from scratch. When the cluster recovers existing data under normal operation the preferred source is ignored. For example, a second Chicago cluster could specify the cluster ID of the original Chicago database as the preferred source, like so:
2nd Chicago Cluster
<dr id="4" role="xdcr" >
   <connection source="CHIserverX,CHIserverY,NYserverA,NYserverB"
               preferred-source="2" />
</dr>Once the servers are initialized with the necessary configuration, you can start the database clusters. However, it is important to note three important points:
Only one of the clusters can have data in the DR tables when setting up XDCR and that database must be the first in the XDCR network. In other words, start the database containing the data first. Then start and connect a second, empty database to it.
As soon as the databases start, they automatically attempt to contact each other, verify that the DR table schema match, and start the DR process
Only one database can join the XDCR network at a time. You must wait for each joining cluster to complete the initial synchronization before starting the next.
Often the easiest method for starting the databases is to:
Start one cluster
Load the schema (including the DR table declarations) and any pre-existing data on that cluster
Once the first cluster is fully configured, start the second cluster and load the schema
Once the second cluster finishes synchronizing with the first, start each additional cluster, one at a time.
Using this approach, DR does not start until step #3 is complete and the first two clusters are fully configured. Then any additional clusters are added separately.
You can then start and load the schema on the databases and perform any other preparatory work you require. Then edit the configuration files — one at a time using the voltadmin update command — filling in the source attribute for each cluster to point at another. As soon as the source attribute is defined and the schema match, the DR process will begin for the first pair of clusters. Once the first two clusters synchronize, you can repeat this process, one at a time, with any other participating clusters.
Note
Although the source attribute can be modified on a running database, the unique cluster ID cannot be changed after the database starts. So it is important to include the <dr> element with the unique ID and xdcr role when initializing the database root directories.
As soon as the databases start with DR enabled, they attempt to contact a cooperating database to start replication. Each cluster will issue warnings until the schema for the databases match. This is normal and gives you time to load a matching schema. The key point is that once matching schema are loaded on the databases, replication will begin automatically.
When replication starts, the following actions occur:
The clusters verify that the DR tables match on both clusters.
If data already exists in the DR tables of the first database, that cluster sends a snapshot of the current contents to the other cluster where it is restored into the appropriate tables.
Once the snapshot, if any, is restored, both databases (and any other participating clusters) start sending binary logs of changes from DR tables to the other cluster.
If any errors occur during the snapshot transmission, replication stops and must be restarted from the beginning. However, once the third step is reached, replication proceeds independently for each unique partition and, in a K safe environment, the DR process becomes durable across node failures and rejoins as well as cluster shutdowns and restarts.
SQL statements such as DELETE, INSERT, and UPDATE are transmitted through the DR binary logs, but schema changes are not. Therefore, you must make schema changes to each database separately. More importantly, while doing this you must be careful to ensure that no transactions attempt to modify data in tables where the schema does not match on the cooperating clusters.
If a consumer cluster (cluster A) receives a replication record in the binary log that does not match the schema for that table in the database, the consumer will stop processing binary logs from the producer (cluster B). Replication will remain stalled until the schema is updated to match what was received from the producer. At the same time, the producer will buffer any subsequent transactions waiting for the consumer to resume replication.
In the best case, there are mismatched transactions in only one direction (that is, from cluster B to cluster A). If so, once you update the schema on the stalled consumer cluster A, replication resumes and cluster B can send the subsequent transactions it had buffered.
However, while binary logs from the producer are stalled, the consumer continues to process client transactions itself and will send those transactions as binary logs to the other cluster. That is, cluster A also acts as a producer sending binary logs to cluster B as a consumer. If there are simultaneous write transactions to the same table on the two clusters while the schema do not match, a deadlock can result. Both clusters will stall due to mismatched schema and their content will have diverged. In this situation, your only option is to choose one of the clusters as the "winner" and reinitialize the other cluster and restart XDCR from scratch.
To avoid conflicts, the safest process for changing the schema for DR tables in XDCR is the following:
Pause and drain the outstanding DR binary logs on all clusters using the voltadmin pause --wait command
Update the schema for the DR tables on all clusters
Resume all clusters using the voltadmin resume command
This process ensures that no transactions are processed until the schema on all clusters in the XDCR relationship are updated and in sync. However, this process also means that there are no client transactions processed during the update.
It is possible to update the schema without pausing the database. However, to do this, you must be extremely careful to ensure that no transactions attempt to modify tables while the schema differ between the clusters. For example, it is possible to add tables to the database schema without pausing the database. You can add the new tables to the databases in one step, then update the stored procedures and client applications in a second step. This way no client applications access the new tables until their schema exist and match on all of the XDCR databases. At the same time, ongoing transactions associated with older tables are not impacted.
If, for any reason, you need to break replication between the XDCR databases, you can issue the voltadmin dr reset command to any cluster. For example, if one of two clusters goes down and will not be brought back online for an extended period, you can issue a voltadmin dr reset command on the remaining cluster to tell it to stop queuing binary logs. If not, the logs will be saved on disk, waiting for the other cluster to return, until you run out of disk space.
When using multiple clusters in an XDCR environment, you must choose whether to break replication with all other clusters (voltadmin dr reset --all) or with one specific cluster. Breaking replication with all clusters means that all of the other clusters will need to restart DR from scratch to rejoin the XDCR environment. Breaking replication with a single cluster means the remaining clusters retain their XDCR relationship.
If you wish to remove just one, active cluster from the XDCR relationship, you can issue the voltadmin dr drop command to the cluster you wish to remove. This command finalizes any remaining DR logs on the cluster and tells all other clusters to break their DR connection with that cluster. If the cluster you want to remove is not currently running, you can issue the voltadmin dr reset --cluster=n to all the remaining clusters where n is the cluster ID of the cluster being removed.
However, there is a danger that if you remove a failed cluster from a multi-cluster XDCR environment, the failed cluster may not have sent the same binary logs to all of the other clusters. In which case, when you drop that cluster from the environment, the data on the remaining clusters will diverge. So, using dr reset --cluster is recommended only if you are sure that there were no outstanding logs to be sent from the failed cluster. For example, stopping an XDCR cluster with an orderly shutdown (voltadmin shutdown) ensures that all its binary logs are transmitted and therefore the other clusters are in sync.
When using the dr reset --cluster command, you must also include the --force option to verify that you understand the risks associated with this action. So, the process for removing a single, failed cluster from a multi-cluster XDCR environment is:
Identify the cluster ID of the cluster that has failed.
Issue the voltadmin dr reset --cluster={failed-cluster-ID} --force command on all the remaining clusters to clear the binary log queues.
This way, the remaining clusters can maintain their XDCR relationship but not retain queued data for the failed cluster. If, later, you want to rejoin the failed cluster to the XDCR environment, you will need to reinitialize the failed cluster's root directories and restart its XDCR relationship from scratch.
It is not possible to mix XDCR clusters and passive DR in the same database relationship. However, it is possible to create "virtual" replicas in a XDCR environment, if your business requires it.
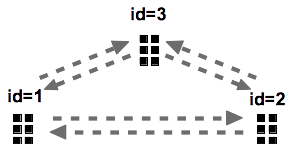
Normally, in an XDCR environment, all cluster participate equally. They can all initiate transactions and replicate those transactions among themselves, as shown in Figure 11.6, “Standard XDCR Configuration”.
If you also want to have one (or more) clusters on "standby", for example, purely for disaster recovery or to
off-load read-only workloads, you can dedicate clusters from within your XDCR environment for that purpose. The easiest
way to do that is to configure the extra clusters as normal XDCR clusters. That is setting their role as "XDCR" and
assigning them a unique DR ID. However, rather than starting the clusters in normal operational mode, you can use the
--pause flag on the voltdb start command to start them in admin mode. This way no
transactions can be initiated on the cluster's client ports. However, the cluster will receive and
process DR binary logs from the other clusters in the DR relationship. Figure 11.7, “XDCR Configuration with Read-Only Replicas”
demonstrates one such configuration.

One aspect of database replication that is unique to cross datacenter replication (XDCR) is the need to prepare for and manage conflicts between the databases. Conflict resolution is not an issue for passive replication since changes travel in only one direction. However, with XDCR it is possible for changes to be made to the same data at approximately the same time on two databases. Those changes are then sent to the other database, resulting in possible inconsistencies or invalid transactions.
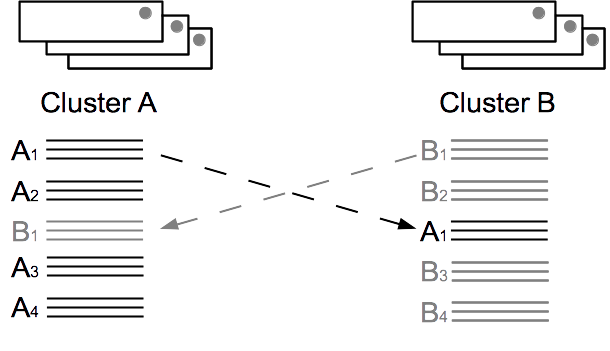
For example, say clusters A and B are processing transactions as shown in Figure 11.8, “Transaction Order and Conflict Resolution”. Cluster A executes a transaction that modifies a specific record and this transaction is included in the binary log A1. By the time cluster B receives the binary log and processes A1, cluster B has already processed its own transactions B1 and B2. Those transactions may have modified the same record as the transaction in A1, or another record that would conflict with the change in A1, such as a matching unique index entry.
Under these conditions, cluster B cannot simply apply the changes in A1 because doing so could violate the uniqueness constraints of the schema and, more importantly, is likely to result in the content of the two database clusters diverging. Instead, cluster B must decide which change takes priority. That is, what resolution to the conflict is most likely to produce meaningful results or match the intent of the business application. This decision making process is called conflict resolution.
No matter what the resolution, it is important that the database administrators are notified of the conflict, why it occurred, and what action was taken. The following sections explain:
How to avoid conflicts
How VoltDB resolves conflicts when they do occur
What types of conflicts can occur
How those conflicts are reported
VoltDB uses well-defined rules for resolving conflicts. However, the best protection against conflicts and the problems they can cause is to design your application to avoid conflicts in the first place. There are at least two things you can do in your client applications to avoid conflicts:
Use Primary Keys
It is best, wherever possible, to define a primary key for all DR tables. The primary key index greatly improves performance for finding the matching row to apply the change on a consumer cluster. It is also required if you want conflicts to be resolved using the standard rules described in the following section. Any conflicting action without a primary key is rejected.
Apply related transactions to the same cluster
Another tactic for avoiding conflicts is to make sure any autonomous set of transactions affecting a set of rows are all applied on the same cluster. For example, ensuring that all transactions for a single user session, or associated with a particular purchase order, are directed to the same cluster.
Do not use TRUNCATE TABLE
TRUNCATE TABLE is a convenient statement for deleting all records in a table. The statement is optimized to avoid deleting row by row. However, this optimization means that the binary log does not report which rows were deleted. As a consequence, a TRUNCATE TABLE statement can easily produce a conflict between two XDCR clusters that is not detected or reported in the conflict log.
Therefore, do not use TRUNCATE TABLE with XDCR. Instead, explicitly delete all rows with a DELETE statement and a filter. For example,
DELETE * FROM table WHERE
            column=column
ensures all deleted rows are identified in the binary log and any conflicts are accurately reported.Note that
DELETE FROM tableis not sufficient, since its execution plan is optimized to equate to TRUNCATE TABLE. Also, when deleting all rows in a table, it is best to perform the delete in smaller batches to avoid overflowing the maximum size allowed for the binary log packets.
Even with the best application design possible, errors in program logic or operation may occur that result in conflicting records being written to two or more databases. When a conflict does occur, VoltDB follows specific rules for resolving the issue. The conflict resolution rules are:
Conflicts are resolved on a per action basis. That is, resolution rules apply to the individual INSERT, UPDATE, or DELETE operation on a specific tuple. Resolutions are not applied to the transaction as a whole.
The resolution is that the incoming action is accepted (that is, applied to the receiving database) or rejected.
Only actions involving a table with a primary key can be accepted, all other conflicting actions are rejected.
Accepted actions are applied as a whole — the entire record is changed to match the result on the producer cluster. That means for UPDATE actions, all columns are written not just the columns specified in the SQL statement.
For tables with primary keys, the rules for which transaction wins are, in order:
DELETE transactions always win
If neither action is a DELETE, the last transaction (based on the timestamp) wins
Let's look at a simple example to see how these rules work. Assume that the database stores user records, using a numeric user ID as the primary key and containing columns for the user's name and password. A user logs on simultaneously in two locations and performs two separate updates: one on cluster A changing their name and one on cluster B changing the password. These updates are almost simultaneous. However, cluster A timestamps its transaction as occurring at 10:15.00.003 and cluster B timestamps its transaction at 10:15.00.001.
The binary logs from the two transactions include the type of action, the contents of the record before and after the change, and the timestamps — both of the last previous transaction and the timestamp of the new transaction. (Note that the timestamp includes both the time and the cluster ID where the transaction occurred.) So the two binary logs might look like the following.
Binary Log A1:
| |
BeforeUserID: 12345 Name: Joe Smith Password: abalone | After UserID: 12345
Name: Joseph Smith
Password: abalone |
Binary Log B1:
| |
BeforeUserID: 12345 Name: Joe Smith Password: abalone | After UserID: 12345
Name: Joe Smith
Password: flounder |
When the binary log A1 arrives at cluster B, the DR process performs the following steps:
Uses the primary key (12345) to look up the current record in the database.
Compares the current timestamp in the database with the previous timestamp in the binary log.
Because the transaction in B1 has already been applied on cluster B, the time stamps do not match. A conflict is recognized.
A primary key exists, so cluster B attempts to resolve the conflict by comparing the new timestamp, 10:15.00.003, to the current timestamp, 10:15.00.001.
Because the new timestamp is the later of the two, the new transaction "wins" and the change is applied to the database.
Finally, the conflict and resolution is logged. (See Section 11.3.8.4, “Reporting Conflicts” for more information about how conflicts are reported.)
Note that when the UPDATE from A1 is applied, the change to the password in B1 is overwritten and the password is reset to "abalone". Which at first looks like a problem. However, when the binary log B1 arrives at cluster A, the same steps are followed. But when cluster A reaches steps #4 and 5, it finds that the new timestamp from B1 is older than the current timestamp, and so the action is rejected and the record is left unchanged. As a result both databases end up with the same value for the record. Essentially, the password change is dropped.
If the transaction on cluster B had been to delete the user record rather than change the password, then the outcome would be different, but still consistent. In that case, when binary log A1 reaches cluster B, it would not be able to find the matching record in step #1. This is recognized as a DELETE action having occurred. Since DELETE always wins, the incoming UPDATE is rejected. Similarly, when binary log B1 reaches cluster A, the previous timestamps do not match but, even though the incoming action in B1 has an older timestamp than the UPDATE action in A1, B1 "wins" because it is a delete action and the record is deleted from cluster A. Again, the result is consistent across the two databases.
The real problem with conflicts is when there is no primary key on the database table. Primary keys uniquely identify a record. Without a primary key, there is no way for VoltDB to tell, even if there are one or more unique indexes on the table, whether two records are the same record modified or two different records with the same unique key values.
As a result, if there is a conflict between two transactions without a primary key, VoltDB has no way to resolve the conflict and simply rejects the incoming action. Going back to our example, if the user table had a unique index on the user ID rather than a primary key, and both cluster A and cluster B update the user record at approximately the same time, when binary log A1 arrives at cluster B, it would look for the record based on all columns in the record and fail to find a match.
However, when it attempts to insert the record, it will encounter a constraint violation on the unique index. Again, since there is no primary key, VoltDB cannot resolve the conflict and rejects the incoming action, leaving the record with the changed password. On cluster A, the same process occurs and the password change in B1 gets rejected, leaving cluster A with a changed name column and database B with a changed password column — the databases diverge.
The preceding section uses a simple case of conflicting UPDATE transactions to illustrate the steps involved in conflict resolution. However, there are several different types of conflict that can occur. First, there are three possible actions that the binary log can contain: INSERT, UPDATE, or DELETE. There are also three types of conflicts that can be generated:
Missing row — The affected row is missing from the consumer database.
Timestamp mismatch — The affected row exists in the consumer database, but has a different timestamp than expected (in other words, it has been modified).
Constraint violation — Applying the incoming action would result in one or more constraint violations on unique indexes.
A missing row means that the binary log contains an UPDATE or DELETE action, but the affected row cannot be found in the consumer database. (A missing row conflict cannot occur for INSERT actions, since INSERT assumes no such row exists.) In the case of a missing row conflict, VoltDB assumes a DELETE action has removed the affected row. Since the rule is that DELETE wins, this means the incoming action is rejected.
Note that if the table does not have a primary key, the assumption that a DELETE action removed the row is not guaranteed to be true, since it is possible an UPDATE changed the row. Without a primary key, there is no way for the DR process to find the matching row when some columns may have changed, so it assumes it was deleted. As a result, an UPDATE could occur on one cluster and a DELETE on the other. This is why assigning primary keys is recommended for DR tables when using XDCR.
If the matching primary key is found, it is still possible that the contents of the row have been changed. In which case, the timestamps will not match and a timestamp mismatch conflict occurs. Again, this can happen for UPDATE and DELETE actions where an existing row is being modified. If the incoming action is a DELETE, it takes precedence and the row is deleted. If not, if the incoming action has the later of the two timestamps, it is accepted. If the existing record has the later timestamp, the incoming action is rejected.
Finally, whether the timestamps match or not, with an INSERT or UPDATE action, it is possible that applying the action would violate one of more unique index constraints. This can happen because another row has been updated with matching values for the unique index or another record has been inserted with similar values. Whatever the cause, VoltDB cannot apply the incoming action so it is rejected. Note that for a single action there can be more than one unique index that applies to the table, so there can be multiple constraint violations as well as a possible incorrect timestamp. When a conflict occurs, all conflicts associated with the action are included in the conflict log.
To summarize, the following chart shows the conflicts that can occur with each type of action and the result for tables with a primary key.
| Action | Possible Conflict | Result for Tables with Primary Key |
|---|---|---|
| INSERT | Constraint violation | Rejected |
| UPDATE | Missing row | Rejected |
| DELETE | Missing row | Accepted (no op) |
VoltDB makes a record of every conflict that occurs when processing the DR binary logs. These conflict logs include:
The intended action
The type of conflict
The timestamp and contents of the row before and after the action from the binary log
The timestamp and contents of the row(s) in the consumer database that caused the conflict
The timestamp and cluster ID of the conflict itself
By default, these logs are written as comma-separated value (CSV) files on the cluster where the conflicts occur.
These files are usually written to a subfolder of the voltdbroot directory
(voltdbroot/xdcr_conflicts) using the file prefix LOG. However, you can
configure the logs to be written to different destinations or locations using the VoltDB export configuration
settings.
The DR process writes the conflicts as export data to the export stream VOLTDB_XDCR_CONFLICTS. You do not need to explicitly configure export — the DR process automatically declares the necessary export streams, establishes a default export configuration for the file connector, and enables the export stream. However, if you want the data to be sent to a different location or using a different export connector, you can do this by configuring the export stream yourself.
For example, if you want to export the XDCR conflicts to a Kafka stream where they can be used for automatic notifications, you can change the export properties in the configuration file. The following configuration file code writes the conflict logs to the Kafka topic sysops on the broker kafkabroker.mycompany.com:
<export>
   <configuration enabled="true" type="kafka"
                  stream="VOLTDB_XDCR_CONFLICTS">
       <property name="broker">kafkabroker.mycompany.com</property>
       <property name="topic">sysops</property>
   </configuration>
</export>
Each action in the binary log can generate one or more conflicts. When this occurs, VoltDB logs the conflict(s) as multiple rows in the conflict report. Each row is identified by the type of action (INSERT, UPDATE, DELETE) as well as the type of information the row contains:
EXISTING (EXT) — The timestamp and contents of an existing row in the consumer database that caused a conflict. There can be multiple existing row logs, if there are multiple conflicts.
EXPECTED (EXP) — The timestamp and contents of the row that is expected before the action is applied (from the binary log).
NEW (NEW) — The new timestamp and contents for the row once the action is applied (from the binary log).
DELETE (DEL) — For a DELETE conflict, the timestamp and cluster ID indicating when and where the conflict occurred.
For an INSERT action, there is no EXPECTED row. For either an INSERT or an UPDATE action there is no DELETE row. And for a DELETE action there is no NEW row. The order of the rows in the report is as follows:
The EXISTING row, if there is a timestamp mismatch
The EXPECTED row, if there is a timestamp mismatch
One or more EXISTING rows, if there are any constraint violations
The NEW row, for all actions but DELETE
The DELETE row, for the DELETE action only
Table 11.1, “Structure of the XDCR Conflict Logs” describes the structure and content of the conflict log records in the export stream.
Table 11.1. Structure of the XDCR Conflict Logs
| Column Name | Datatype | Description | ||||
|---|---|---|---|---|---|---|
| ROW_TYPE | 3 Byte string | The type of row, specified as:
| ||||
| ACTION_TYPE | 1 Byte string | The type of action, specified as:
| ||||
| CONFLICT_TYPE | 4 Byte string | The type of conflict, specified as:
| ||||
| CONFLICTS_ON_PRIMARY_KEY | TINYINT | Whether a constraint violation is associated with the primary key. 1 for true and 0 for false. | ||||
| DECISION | 1 Byte string | How the conflict was resolved, specified as:
| ||||
| CLUSTER_ID | TINYINT | The DR cluster ID of the cluster that last modified the row | ||||
| TIMESTAMP | BIGINT | The timestamp of the row. | ||||
| DIVERGENCE | 1 Byte string | Whether the resulting action could cause the two cluster to diverge, specified as:
| ||||
| TABLE_NAME | String | The name of the table. | ||||
| CURRENT_CLUSTER_ID | TINYINT | The DR cluster ID of the cluster reporting the conflict. | ||||
| CURRENT_TIMESTAMP | BIGINT | The timestamp of the conflict. | ||||
| TUPLE | JSON-encoded string | The schema and contents of the row, as a JSON-encoded string. The column is limited to 1MB in size. If the schema and contents exceeds the 1MB limit, it is truncated. | ||||
[a] Update operations are executed as two separate statements: a delete and an insert, where only one of the two statements might result in a violation. For example, the delete may trigger a missing row violation but the insert not generate a violation. In which case the EXT row of the conflict log reports the MISS conflict and the NEW row reports NONE. | ||||||